Shipping Carrier App Development Guide
Table of Contents
- Partner registration and APP creation
- APP installation
- Carrier creation
- Creation of carrier options
- Volumetry
- Treatment of rates
- Limits
- The CODE & Reference ID parameters
- Free Shipping calculation
- New shipments notifications
- Admin links
- Process the order
- Report a tracking code
- Shipping status updates
Glossary
- Carrier: It is the entity that represents the shipping company in Tiendanube.
- Carrier option: Shipping service offered by a carrier.
- Shipping rates: Set of shipping calculations that the carrier offers for each carrier option created in the store.
- Merchant: Shop's owner.
- Consumer: Person who buys in a store.
Introduction
This documentation provides an explanation of what a Shipping APP is and serves as a guide for the development process. The construction process is divided into 5 steps:
- Initial setup —> The first steps to create a shipping application ○ Partner registration and APP creation ○ APP installation ○ Carrier creation ○ Creation of carrier options
- Shipping Rates —> Definition of business rules to perform shipment calculations.
- Shipment management —> Mechanisms to exchange information when a purchase occurs on Tiendanube. ○ Notification of new shipments ○ Get order data ○ Report the shipping code ○ Update shipment statuses
- Integration levels —> Classification of the APP according to the functionalities developed by the partner.
- Testing Checklist —> List to guide the functional test of the APP.
Setting-up
Partner account and creation of the APP
To interact with our APIs you have to create an APP. The APPs represent the products of our partners on our platform. Each APP has its own credentials, which are required to authenticate on our platform, as well as certain permissions to access the different scopes of our API. The steps to create a Shipping APP are as follows:
- If your company does not yet have an account on our partner portal, you must create one by entering the following link
- Once inside the partner portal, an APP must be created ensuring that the fields are completed with real information. How to set up an APP (Portuguese version)
- It is important to pay close attention to the “Redirect URL” field, which is a key part of the APP installation process. Later it can be modified if necessary.
- You will surely want to include a good description of the application and the services offered, this information will be displayed in our App Store and other sections of our platform.
- Ensure that the category of the APP is "Shipping".
- Very important: Once the APP is created, ensure that it has the following permission scopes enabled in the portal: ○ write_shipping ○ Write_orders ○ read_customers
Important: Our Shipping API is not enabled by default for all partner accounts. Please fill out this form: https://forms.gle/oqP1BrtwMzNb7xCM9, so our Platform Development team can enable the Shipping API in your partner account and its demo stores.
APP installation
To obtain the authorization code. Use the following URL to start the installation flow in a store: https://${store_name}.mitiendanube.com/admin/apps/${app_id}/authorize After the merchant approves the permissions, redirect the merchant to the URL redirect of the APP (defined in the configuration, along with the CODE in the URL)
Get the access_token
    curl --location --request POST
    'https://www.tiendanube.com/apps/authorize/token' \
    --header 'Content-Type: application/x-www-form-urlencoded' \ --data-urlencode 'client_id=$\{client_id\}' \
    --data-urlencode 'client_secret=$\{client_secret\}' \
    --data-urlencode 'grant_type=authorization_code' \
    --data-urlencode 'code=$\{authorization_code\}'
Note 1:
We use placeholders to:
- ${code}: From the query string of the Redirect URL.
- ${client_secret}
- ${client_id} -
Note 2:
${client_id} y ${app_id} represent the same value.
Creation of the Shipping Carrier
In order for stores to view, activate and configure the new shipping method, a Carrier must be created. The carrier is the entity that represents the shipping company in Tíanube and it is to which all services are added. Each integrator partner must generate only 1 (one) Shipping Carrier. To create the carrier, the following information must be provided.
- name: The name of the logistics company.
- callback_url: It is the URL to which we are going to consult to obtain the shipping costs.
- types: indicates if the carrier supports ship (home delivery) and / or pickup (delivery at pickup point). In case of being the options, place both separated with a comma.
Example:
POST /shipping_carriers
{
  "name": "My Shipping Company",
  "callback_url": "https://example.com/rates",
  "types": "ship,pickup"
}
HTTP/1.1 201 Created
{
  "id": 123,
  "name": "My Shipping Company",
  "active": true,
  "callback_url": "https://example.com/rates",
  "types": "ship,pickup",
  "created_at": "2013-06-11T11:12:10-03:00",
  "updated_at": "2013-06-11T11:12:10-03:00"
}
Create shipping services (carrier_option)
Once the carrier was created, the API returns the carrier's data set, among these is the ID of the carrier in Tiendanube. This ID should be used to create the shipping services, hereinafter carrier_option. The carrier options are the shipping services (shipping and pickup) offered by the carrier. Each carrier option represents a service, or set of services with similar characteristics that the company offers. These appear in the shipping carrier configuration and users will be able to make configurations such as: enable / disable the service, indicate if the service supports free shipping, add cost and / or days additional to the shipping rates obtained.
Note 1:
Each carrier option (service) must have a unique CODE. That means that there cannot be 2 carrier_option with the same CODE.
Note 2:
A carrier option will only be able to answer 1 rate per inquiry. Otherwise, only the first one will be taken.
Note 3:
The configurations made by the user in Tiendanube should not affect the payload of the app. They will be applied exclusively by Tiedanube upon receiving the rates from the APP.
Note 4:
If the shipping method adds more shipping options, to reflect them in the stores, they must create the corresponding carrier_options in the stores that are customers of the APP. And add it as a new carrier_option when installing the APP.
Note 5:
The allow_free_shipping attribute must be created with the value False. The store owner will modify this configuration from the admin whenever he wishes.
Example:
**POST /shipping_carriers/#{carrier_id}/options POST /shipping_carriers/123/options **
{
  "code": "standard",
  "name": "Servicio de envío Estándar"
}
HTTP/1.1 201 Created
{
  "id": 1,
  "code": "standard",
  "name": "Servicio de envío Estandard",
  "additional_days": 0,
  "additional_cost": 00.0,
  "allow_free_shipping": false,
  "active": true,
  "created_at": "2013-04-12T10:15:10-03:00",
  "updated_at": "2013-04-12T10:15:10-03:00"
}
See more about carrier options properties and endpoints
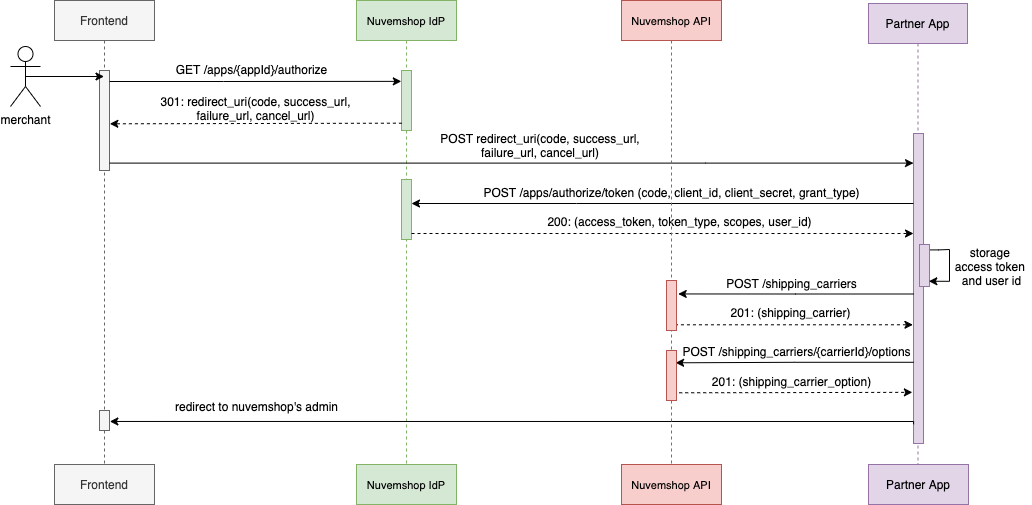
Sequence diagram for creating an APP
Shipping Rates
Shipping rates are the results of shipping calculations for a cart. Every time a store requests a shipping calculation, our platform will make a request to the callback_url, informed in the creation of the carrier, with the information from the shopping cart. See more information. Below are the business rules to take into account when making shipping calculations.
Volumetry
When receiving a request for a shipping calculation, the weight and dimensions of the products contained in the cart must be taken into account to offer the shipping options that are consistent with the products. It may happen that some products do not have weight and dimensions, in this case only offer options when the app has the necessary data to make the shipping calculation.
Treatment of rates
Once the shipping options to return have been calculated, they should not be filtered or modified. Our platform will be responsible for displaying only those options based on the services that the store has activated, as well as adding the cost values and additional days.
Limits
The results to be displayed in the calculator are limited by your amount of shipping rates:
- Rates to Ship: 1 rate for carrier option (code).
- Rates to Pickup: Up to 10 rates per carrier option (code).
The Code parameter
The code parameter value represents each carrier option of the APP. The shipping rates returned in the shipping calculation must have a CODE that corresponds to a carrier option. In this way we can apply the configurations made by the user on the carrier options in the administrator of his store.
Important:
Rates whose CODES do not correspond to a carrier option will not be displayed. Respect uppercase, lowercase and accents.
The code must be a string.
Example:
We have a carrier option that offers a fast delivery service with CODE "express":
{
  "id": 123,
  "code": "express",
  "name": "Express Shipping",
  "additional_days": 0,
  "additional_cost": 0.0,
  "allow_free_shipping": false,
  "active": true,
  "created_at": "2013-04-12T10:15:10-03:00",
  "updated_at": "2013-04-12T10:15:10-03:00"
}
The shipping rate must contain the same CODE "express":
{
    "rates": [
        {
            "name": "Express Shipping",
            "code": "express",
            "price": 14.15,
            "price_merchant": 14.15,
            "currency": "ARS",
            "type": "ship",
            "min_delivery_date": "2020-07-20T14:48:45-0300",
            "max_delivery_date": "2020-07-20T14:48:45-0300",
            "phone_required": true,
            "reference": "ref123"
        },
        { ... }
    ]
}
Important: The shipping rates must be included in an Array named 'rates'. If only one shipping rate exists, it must also be inside that Array. If you have any questions about the fields or any details about the rates, we recommend reading this section.
The reference field must be a string — it cannot be null, as this will prevent the shipping rate from being displayed in the store.
About destination address
The destination address data may vary depending on where the shipping calculation is made and the data currently available. In Tiendanube shipping calculations are made from different places on the platform, for example: the product page, the shopping cart, and the checkout. Depending on where the rates request is made, the destination address may have more or less information.
Product page and Cart: on these pages only the postal code will be sent as destination data to perform the calculation.
      "destination": {
      "name": null,
      "address": null,
      "number": null,
      "floor": null,
      "locality": null,
      "city": null,
      "province": null,
      "country": "AR",
      "postal_code": "1602",
      "phone": null
    },
At Checkout, all the data of the destination address will be sent, as long as it is a home delivery. Ex:
    "destination": {
      "name": null,
      "address": "Juan B. Justo",
      "number": "3000",
      "floor": null,
      "locality": "Nuñez",
      "city": "Capital Federal",
      "province": "Capital Federal",
      "country": "AR",
      "postal_code": "1602",
      "phone": null
    },
With these clarifications, Tiendanube wants to ensure that the buyer completes the checkout with a valid shipping option for their full address.
Reference id
In the rate structure there is a field called reference. This is a field of free use that allows the APP to send an auxiliary value in the shipping calculation that you can later retrieve in the order at the time of processing the shipment. To consult this value, consult the endpoint orders, field shipping_option_reference.
Example: **POST /your_callback_url **
{
  "store_id": 123456,
  "currency": "ARS",
  "language": "es",
  "origin": {
    "name": null,
    "address": "Avenida Cabildo",
    "number": "4781",
    "floor": null,
    "locality": "Nuñez",
    "city": "CapitalFederal",
    "province": "CapitalFederal",
    "country": "AR",
    "postal_code": "1602",
    "phone": null
  },
  "destination": {
    "name": null,
    "address": "JuanB.Justo",
    "number": "3000",
    "floor": null,
    "locality": "Nuñez",
    "city": "CapitalFederal",
    "province": "CapitalFederal",
    "country": "AR",
    "postal_code": "1602",
    "phone": null
  },
  "items": [
    {
      "name": "Myproduct",
      "sku": null,
      "quantity": 1,
      "free_shipping": true,
      "grams": 1000,
      "price": 20.0,
      "dimensions": {
        "width": 12.0,
        "height": 10.0,
        "depth": 10.0
      }
    }
  ]
}
Free Shipping in mixed carts
Note: Check out this video where we show how price and price_merchant rules work in different scenarios.
Mixed carts mean that one product has free shipping and another one has paid shipping, so we have to solve the shipping calculation for this specific scenario. In the shipping rates query we will send to the callback_url all the information to perform the shipping calculation, among this information we will indicate which products have free shipping, and which do not, through the free_shipping = True / False attribute. The following scenarios can occur:
100% free shipping:
All products in the cart have the property free_shipping = true. In this scenario, the APP should not take any additional action. Tiendanube/Nuvemshop is responsible for applying the corresponding discounts. The APP must send the total shipping cost in the price and price_merchant fields.
Mixed cart:
Some products have free shipping (free_shipping = true) and some products do not have free shipping (free_shipping = false). In this case, the APP must perform an additional calculation to obtain the cost with the discount applied for those products that have free shipping. Thus, the APP response will contain 2 (two) different costs:
- price_merchant: Total shipping cost
- price: Total shipping cost with discount applied
How to calculate the discount? Each shipping company can apply its own recipe to perform this calculation. Below we suggest a possibility to perform this calculation price = price_merchant - the cost of shipping the products with free_shipping=true
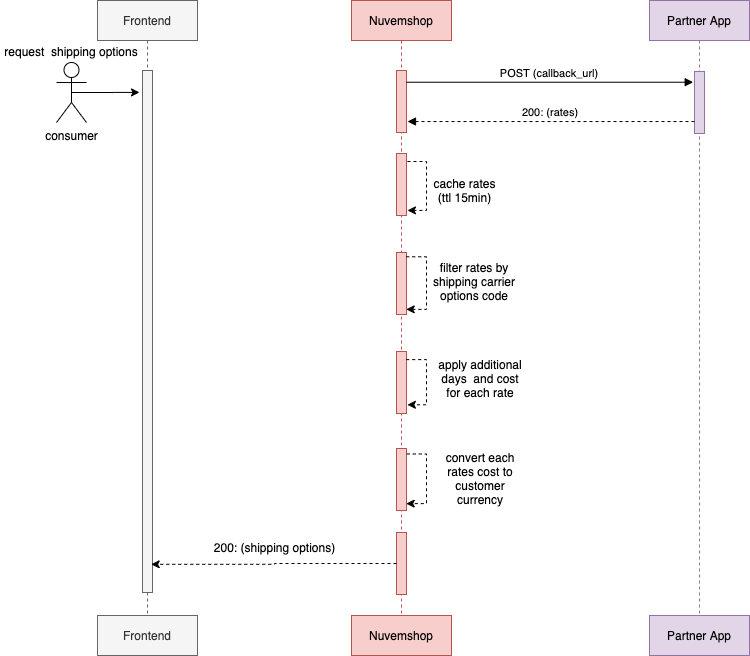
Sequence diagram for shipping rates
Shipment management
In this section we're going to see how the store notifies the App regarding new sales and how the App can obtain the order data to process the shipment.
Notification of shipments
Tiendanube will notify the App regard new shipment either:
- individually, within the order detail;
- in bulk, in the order list;
These notifications are made through links inside the Tiendanube admin that notify the APP about the existence of new shipments to manage. For this, the partner must create the corresponding admin links in the partner portal (see section below).
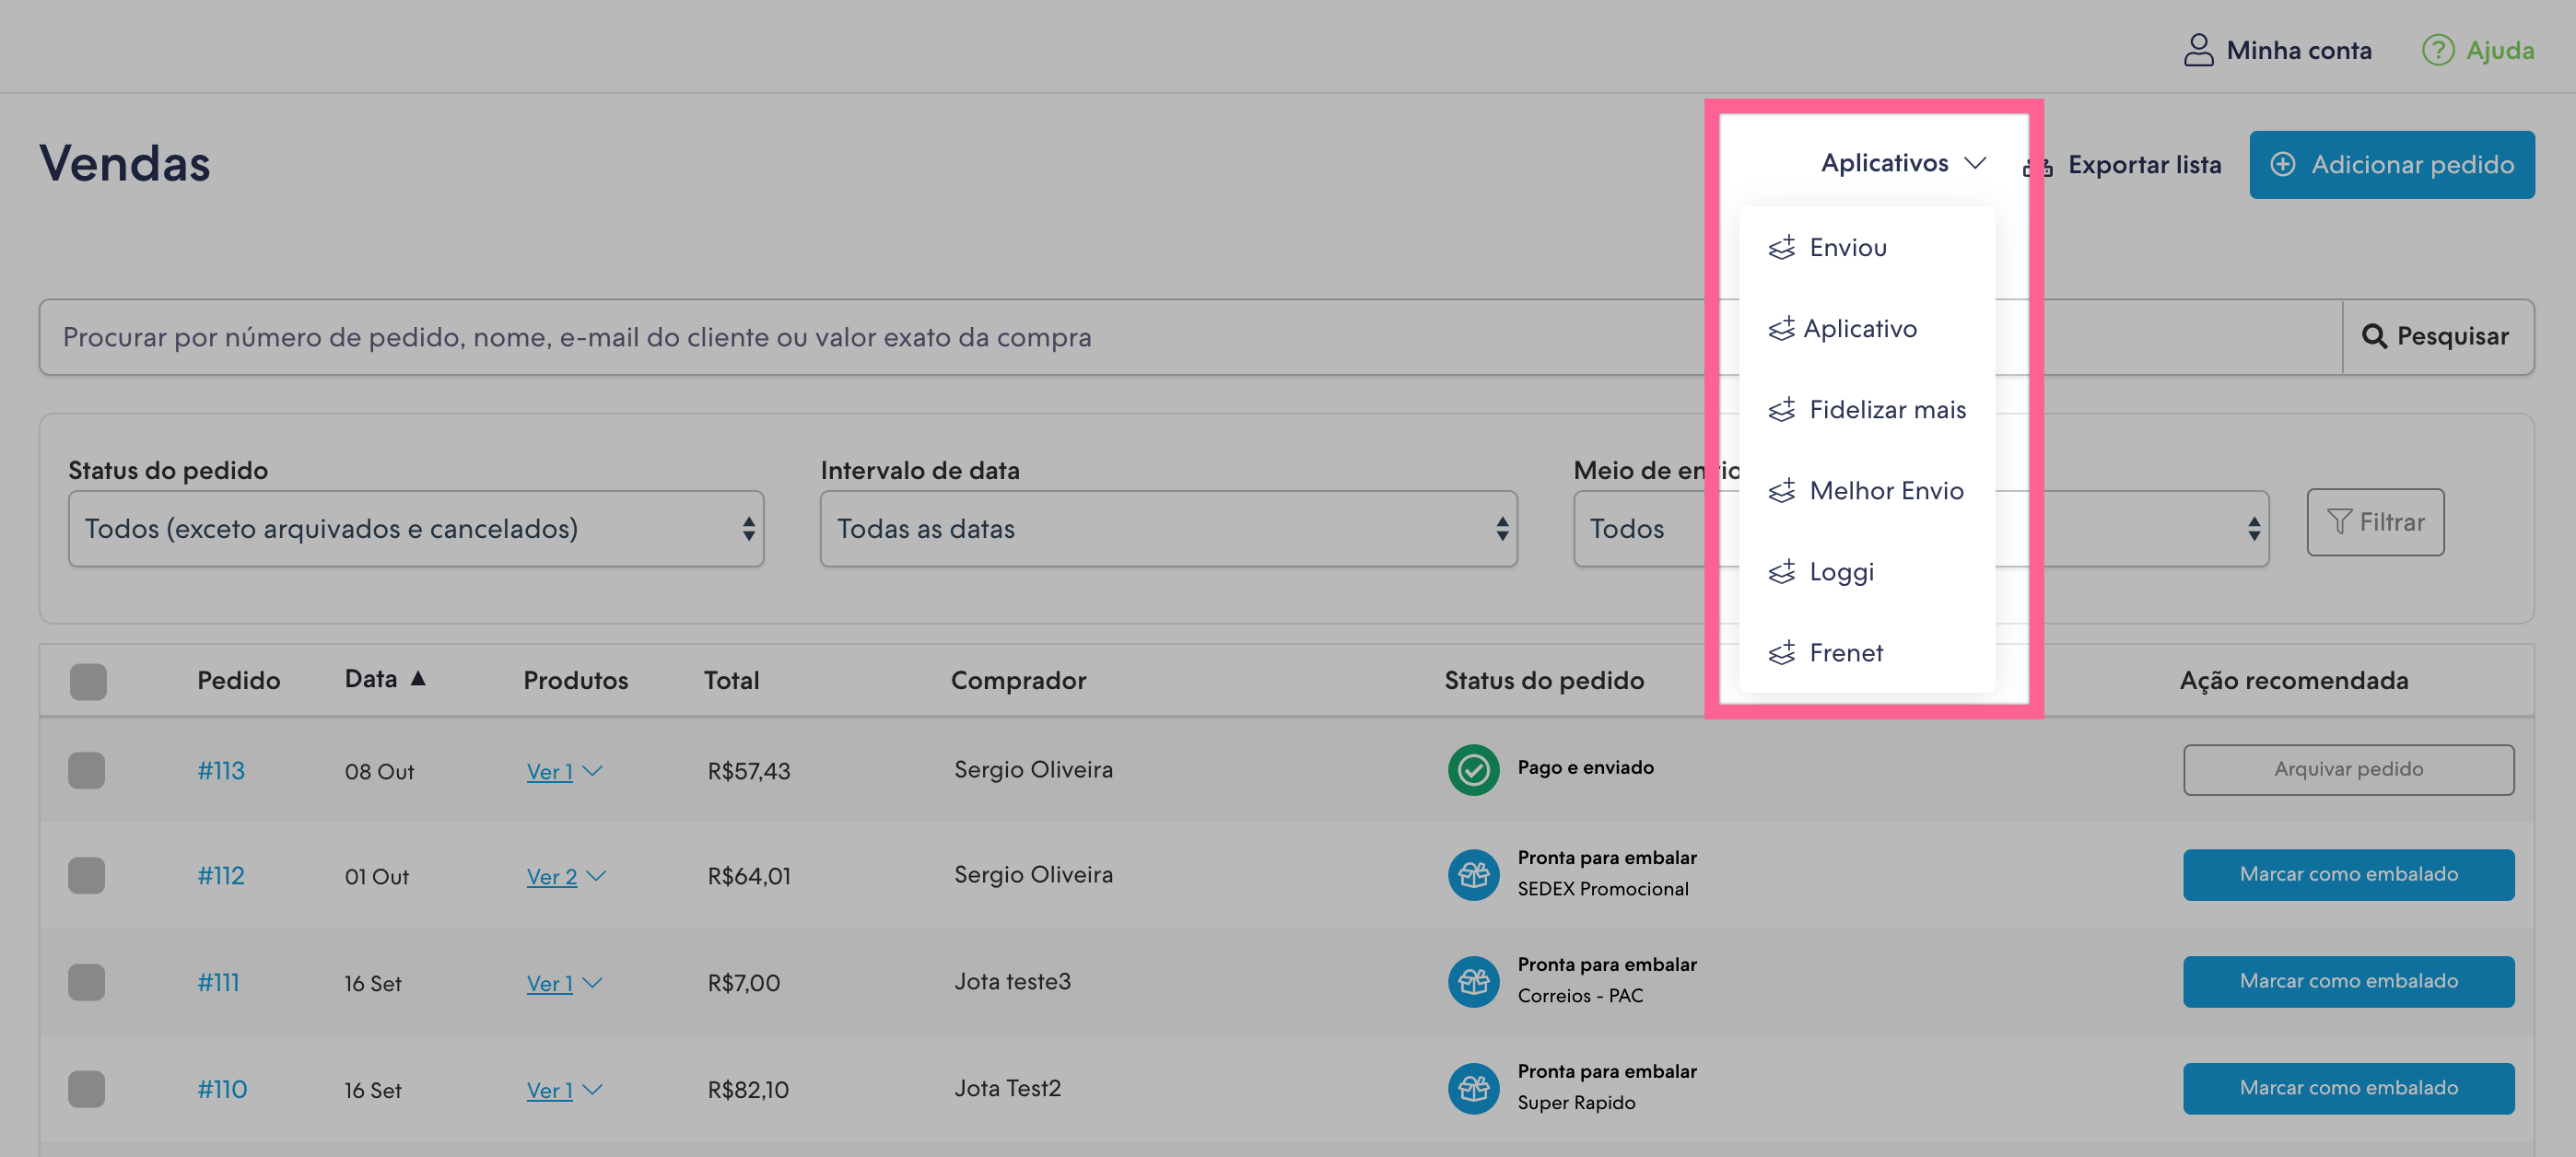
The image above shows admin links for massive actions - but you could also register an admin link to be displayed in a specific order detail.
The admin links are the bridge between Tiendanube and the APP. They allow the Merchant to execute a specific functionality of the APP in Tiendanube's admin. This significantly improves the experience of our customers, optimizing operating times and therefore generating positive user experiences that reinforce integration with the APP. Some ideas to improve the integration experience:
- Notify shipments
- Request package pickup
- Go to label printing
When the Merchant clicks in an admin link, he is redirected to the URL that was configured in the partners portal with some parameters added by Tiendanube:
- Store = Store ID
- Locale = User language
- ID = Identification of the object selected
Example: you configured an admin link for massive action and the Merchant selected two orders on the orders list and clicked on your admin link. Therefore Tiendanube will build an URL like the following and make a request to it:
https://url.app?locale=pt&store=937395&id=128158567&id=127034946
How to create an admin link?
- Go to your App's detail page in the Partner Panel;
- Search for the section "Links de Administrador";
- Hit "Crear links":
- Select the languages in which your link will be available;
- Select where the link will appear (example: order list, product detail);
- Fill the URL to be notified: web address that the user will be redirected when clicking on the link. This is the URL to which we will add the parameters;
- Click on the country and fill the text you want to be displayed to the user (please follow the format [APP Name] - [Acción], example: Shipping Nube - Notify shipments);

- Click on "Crear" to create the admin link;
Process the order
To process the order, the data must be obtained. For this, make a request to the order endpoint using the store id and order id values, received in the admin link, to obtain the order data and process the shipment. View more about get the order info
Reporting a tracking code
Once the shipment management has been done, the tracking number and the URL where to check the shipment status must be notified. For this, perform a POST to /orders/{id}/fulfill indicating:
- shipping_tracking_url
- shipping_tracking_number
View more about how to report a tracking code
Shipping status update
Notification and visibility of a shipment's status change is very important to buyers. Lower the levels of uncertainty and adjust the expectations of receiving the shipment. This translates to fewer interactions between consumers and store owners. For this reason, it is very important to be able to inform us about status changes on our tracking page.
You can see all the states that we support in the documentation. In order to update them, you have to do a POST /orders/{order_id}/fulfillments sending as much events as possible. This means that the buyer can track the order at all times on the order success page. View more about shipping status update
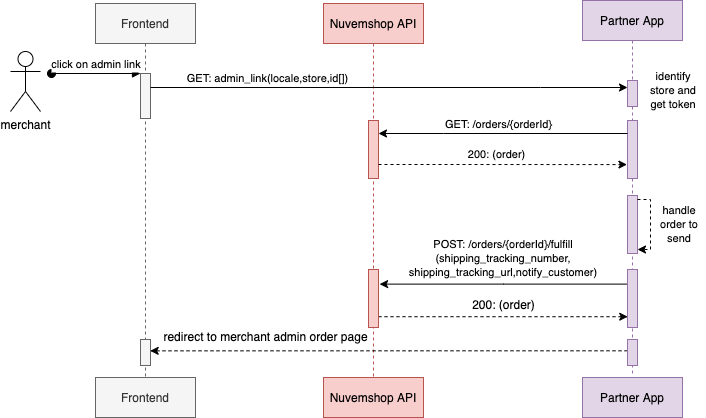
Notification, order processing, and shipment status update