Payment Provider App Development Guide
Glossary
Payment Provider
Actually, short for Payment Service Provider, is any entity that provides all the necessary resources to allow a buyer to pay a merchant for purchased goods or hired services. These resources include information for the potential buyer about the available payment methods, installments, promotions, discounts, etc., as well as the technological resources to execute a payment.
Payment Method Type
The resource that allows a transfer of money from the consumer to the merchant. It can be any of, but not limited to:
- Credit card
- Debit card
- Bank debit (aka "online debit")
- Boleto (Brazil only)
- PIX (Brazil only)
- Ticket (aka "offline payment" or "payment voucher")
- Wire transfer (between two bank accounts via traditional transfer)
- Wallet (i.e. consumer's account credit)
- Cash
- Others
Payment Method ID
For instance, if the Payment Method Type is credit card, then an example of Payment Method ID would be Visa, Mastercard or American Express. Some Payment Method Types, for example PIX, only have one Payment Method ID which happens to be PIX. Even though it's redundant, it leaves space for future variations.
Payment Option
The Payment Method is the resource that allows the transfer of money from the consumer to the merchant, while the Payment Option is how the Payment Method is used to execute the Transaction. In the physical world, if a credit card is selected as the Payment Method, then the payment could be executed using a card reader, or through an app that reads a QR code and processes the credit card information, etc.
A Payment Option has three main properties:
- The Payment Provider that will execute the Transaction.
- One or more supported Payment Method Types.
- An Integration Type.
Integration Type
In terms of user experience, there might be different ways to integrate a Payment Option into a store. Some of them are:
- Transparent: The whole process takes place in the store's website and all the relevant payment information are filled in a form rendered by the store, creating a seamless experience for the buyer.
- External: At some point, the buyer is redirected to a website or app under the Payment Provider's domain where the buyer completes the payment process.
- Modal: When the user submits our checkout form, a modal rendered by the Payment Provider is displayed, and the user completes the payment process within it.
Payment App
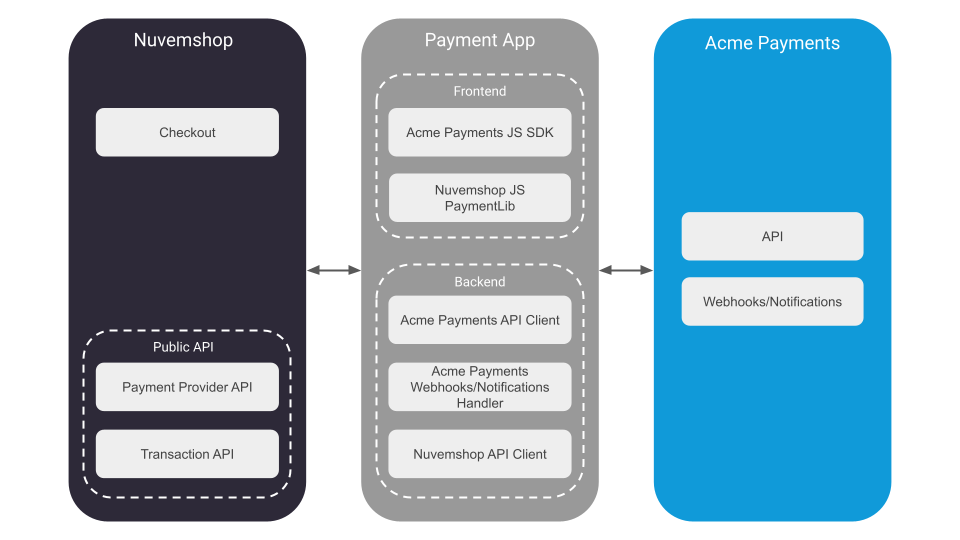
The development of a Nuvemshop Payment App, technologically speaking, more often than not, includes implementing our auth flow, REST APIs and webhooks, as well as the Payment Provider's authentication flow and backend-to-backend APIs.
Also, a Payment App includes a JavaScript implementation of our platform's checkout event handlers. This event handlers usually make requests to the app's backend which, in turn, makes requests to the Payment Provider's APIs.
To illustrate the Payment App concept, let's say we have a Payment Provider called "Acme Payments", here's a classic implementation diagram:
Introduction�
This document provides an explanation of what a Payment App is and it will guide you through its development process.
In very few words, the steps to develop and deploy a Payment App at our platform are:
- The developer creates a partner account at the Nuvemshop Partner portal.
- The developer creates a Payment App at the Partner portal.
- The developer sets up a scalable backend on their own infrastructure where this app will run.
- The developer implements Nuvemshop's authorization flow.
- The developer implements Nuvemshop's REST APIs, including the Payment Provider and the Transaction resources.
- The developer implements their frontend scripts according to Nuvemshop’s JavaScript interface specifications, hosts the file in a public CDN and provides a link to the file through our API.
- The app is audited by Nuvemshop to test the implementation, scalability, stability and other important quality factors.
- The app is released by Nuvemshop.
This process is detailed below in 6 major steps:
- Step 1: Create and Set Up the Payment App
- Step 2: Implement the App Installation Flow
- Step 3: Implement the Payment Provider API
- Step 4: Implement the Checkout Flow
- Step 5: Implement the Payment Processing Flow
- Step 6: Implement the Transaction API
Step 1: Create and Set Up the Payment App
Partner Account and App Creation
To interact with our APIs, you must create a Payment App. This app represents a partner's product in our platform. Each app has a set of credentials required to authenticate against our platform and to be granted access to our APIs on behalf of the merchant, depending on the scopes enabled on the app's settings.
The steps to create a Payment App are as follows:
- If your company doesn't already have a Partner account, it can be created at our Partner Portal for Spanish LATAM or at our Partner Portal for Brazil.
- At the Partner portal, create an app and make sure that all the fields are completed with valid and real data (Note: fake data can be set while the app is in development mode).
- Take special care on the redirect URI which is a key part of the app installation process. You can modify it in the future, if necessary.
- You might want to include a good description of the payment services you offer, since our platform may bring new clients to your business.
- Make sure to choose the Payments category.
- Since you are creating a Payment App, make sure the app has the following scopes enabled on its configuration:
read_paymentswrite_paymentsread_orderswrite_orders
Important: Our Payments API is not enabled by default for all partner accounts. Please contact our Platform Development team to enable our Payments API in your partner account and its demo stores.
App Metadata Configuration
The payments configuration dashboard of a store displays the available Payment Apps for that store so that the merchant can directly install them from there, instead of having to visit the App Store. Our Partner portal currently does not support the configuration of specific parameters for a payments application category, such as information about transaction costs (rates), supported payment methods, etc. However, our Support team will gladly set up that information for you.
The Payment App metadata information is country specific, so, if your app will be published in several countries, you'll need to provide a JSON for each country.
Note: All fields in the metadata object are optional. However, it is required to provide the merchant with a way to check the Payment App's rate information. Therefore, one of the
rates_urlorratesfields must be specified so that the app can be available to stores.
Properties
| Field | Type | Description |
|---|---|---|
type | String | One of aggregator, acquirer or gateway. |
name | String | Name to be displayed to merchants at the store admin tool. |
description | String | Brief description about the app. |
installation_description | String | Brief description of the app installation process. |
installation_url | String | HTTPS URL of the Payment Provider installation site. |
logo_urls | Object | Object containing key:value pair for each version of the logos for the frontend. Only supports HTTPS URLs. See Logos. |
register_url | String | HTTPS URL of the Payment Provider registration site. |
support_url | String | HTTPS URL of the Payment Provider support site. |
support_phone | String | Payment Provider support phone number. |
supported_payment_method_types | Array(String) | List of available payment methods types. See Payment Method Types. |
rates_url | String | [Optional] HTTPS URL of the Payment Provider rate information site. |
rates | Array(Object) | [Optional] List of rates definitions for merchants by payment method type. See Rates. |
features | Array(String) | [Optional] List of features offered by the Payment Provider. See Features. |
Here is an example of what a JSON would look like for the metadata of a Payment App:
{
  "type": "aggregator",
  "name": "Acme Payments",
  "description": "This is a brief description about the Acme Payment App.",
  "logo_urls": {
    "400x120": "https://cdn.acme.com/logos/400x120.png"
  },
  "installation_description": "This is a brief description of the installation process for the Acme Payment App.",
  "register_url": "https://acme.com/register",
  "support_phone": "+54123456789",
  "supported_payment_method_types": [
    "credit_card",
    "wallet"
  ],
  "features": [
    "gateway",
    "special_rates",
    "transparent_checkout"
  ],
  "rates_url": "https://acme.com/rates",
  "rates": [
    {
      "payment_method_type": "credit_card",
      "rates_definition": [
        {
          "percent_fee": "2.15",
          "flat_fee": {
            "currency": "ARS",
            "value": "1.00"
          },
          "plus_tax": true,
          "days_to_withdraw_money": 14
        }
      ]
    },
    {
      "payment_method_type": "wallet",
      "rates_definition": [
        {
          "percent_fee": "1.5",
          "flat_fee": {
            "currency": "ARS",
            "value": "1.00"
          },
          "plus_tax": true,
          "days_to_withdraw_money": 7
        }
      ]
    }
  ]
}
Step 2: Implement the App Installation Flow
A store can have n number of Payment Providers, and every store has their own Payment Providers with their own IDs and these are unrelated to the Payment Providers created by the same app on other stores. This means that each time a merchant installs your app, it must follow the Payment Provider creation flow for that app.
A Payment Provider object contain all the configuration to display payment methods, calculate prices, discounts, installments, among others, on the storefront and it also contains properties required for the checkout process.
The app installation flow is a standard OAuth 2 flow. The details on the app installation flow can be found here and the details on creating a Payment Provider can be found in our Payment Provider API Documentation.
During this flow, the app is expected to create the Payment Provider on the merchant's store.
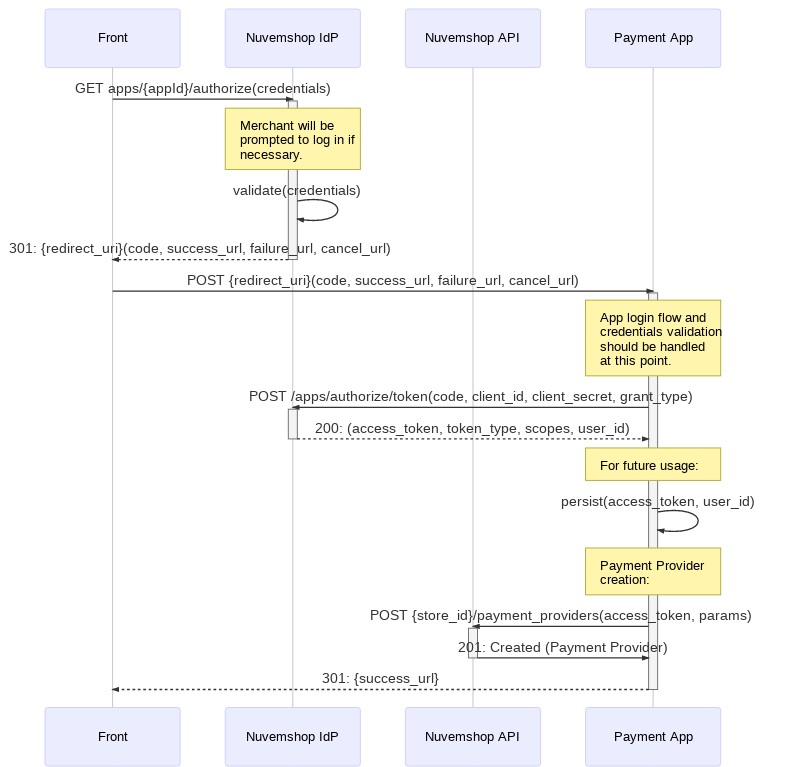
The following sequence helps to illustrate the process concept:
- Front: The web browser.
- Nuvemshop IdP: Nuvemshop's Identity Provider.
- Nuvemshop API: Self described.
- Payment App: Any host on the Payment Provider side.
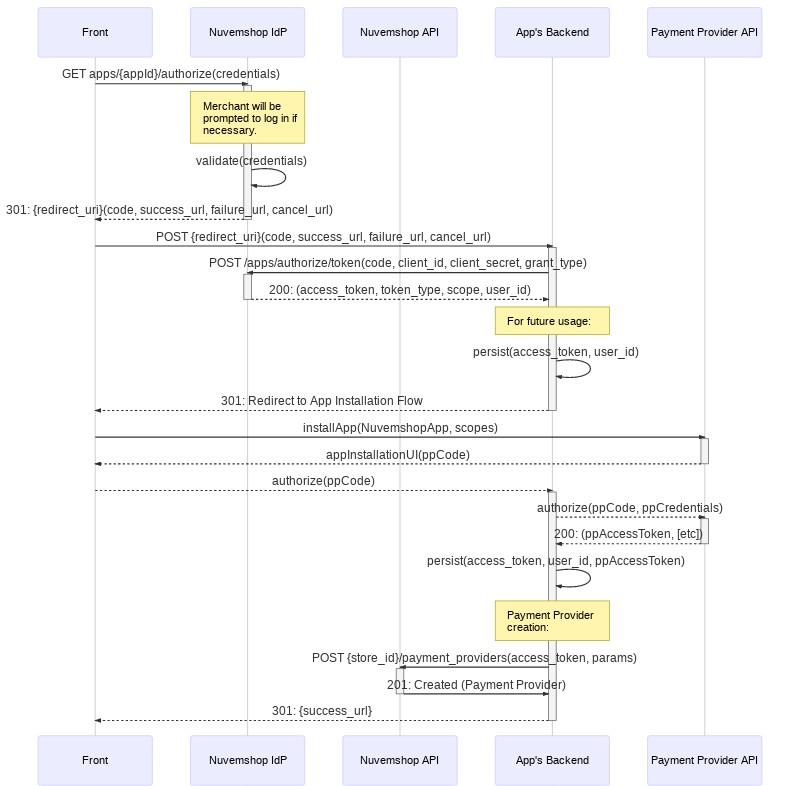
Here's a less abstract example:
- Front: The web browser.
- Nuvemshop IdP: Nuvemshop's Identity Provider.
- Nuvemshop API: Self described.
- App's Backend: Place where both APIs, the one from Nuvemshop and the Payment Provider's one, live together.
- Payment Provider API: The original Payment Provider API.
Installation Flow
(1) Get the Authorization Code
Use the following URL to start the app installation flow in a store:
https://<STORE_DOMAIN>.com/admin/apps/<APP_ID>/authorize
Note: Using placeholders for
store_domainandapp_id.
After accepting the application permissions, the merchant will be redirected to the redirect URI configured for the app, with the authorization code attached as a query string.
(2) Get the Access Token
curl --location --request POST 'https://www.tiendanube.com/apps/authorize/token' \
--header 'Content-Type: application/x-www-form-urlencoded' \
--data-urlencode 'client_id=<CLIENT_ID>' \
--data-urlencode 'client_secret=<CLIENT_SECRET>'' \
--data-urlencode 'grant_type=authorization_code' \
--data-urlencode 'code=<AUTHORIZATION_CODE>'
Note 1: Using placeholders for
client_id,client_secretandauthorization_code.
Note 2:
client_idandapp_idrepresent the same value.
Step 3: Implement the Payment Provider API
You can find the list of Payment Provider object properties and their description in our Payment Provider API Documentation. All of the Payment Provider properties must have valid and real values (Note: fake data can be set while the app is in development mode).
Quick example
curl --location --request POST 'https://api.tiendanube.com/2025-03/<STORE_ID>/payment_providers' \
--header 'Authorization: Bearer <ACCESS_TOKEN>' \
--header 'Content-Type: application/json' \
--data-raw '{
	"name": "Acme Payments",
	"description": "This is a brief description about the Acme Payment App.",

	// Other Payment Provider properties.
}'
See a full example here.
We strongly suggest taking a close look at each of the Payment Provider's object properties to identify which ones may involve special handling and which ones may depend on the merchant's account configuration on the Payment Provider's site. Here's a quick overview of some of the ones we think need extra attention:
Checkout Configuration
Most of our APIs are based on REST interfaces. However, our Checkout API are based on both, REST and JavaScript interfaces. For the Checkout API, the configuration is made through our REST API but the frontend interactions are handled by the JavaScript interface. This allows the app developer to implement their own JavaScript SDKs on our checkout's frontend without any intervention from our development team.
The Payment Provider has two checkout related properties:
-
checkout_payment_options: List of Payment Options (such astransparent,externalandmodal), and their properties which include some likename,logo_urlandsupported_payment_method_types, among others. -
checkout_js_url: The handlers for each checkout payment option (such asonLoad,onSubmit, etc.) are implemented through our JavaScript API. This property contains a HTTPS URL pointing to the file with these implementations so our checkout can run them on the frontend. This URL will be requested from the frontend, which means that the JS file must be hosted on a CDN capable of handling high traffic.
Note: The documentation of our Checkout API can be found here. Find more details about how to implement your own SDKs on the checkout JS file on the next section.
Supported Currencies
This property contains a list of supported currencies in ISO 4217 format.
The content of this field usually depends on settings on the merchant's app account. It is important to set valid and real values on this field making sure it reflects the merchants settings to avoid any unexpected behaviour.
Nuvemshop will use this value as a reference to show (allow) or hide (deny) the Payment Provider to buyers based on several business rules. Incorrect supplied values may result in incorrect or unsupported transactions being executed.
Storefront Scripts
Note that our frontend has two main components: Storefront and Checkout.
In case any frontend JS script unrelated to the checkout process like, for example, a fraud prevention script such as a digital footprint, needed to be added to the merchant website's storefront, our API has a resource for that purpose. Details on how to implement it can be found following this link.
Any request to the Script API should be sent during the Payment App's installation process. Your app will need an extra scope to access this resource: write_scripts. You must enable it at the app's configuration form on the Partner portal.
Step 4: Implement the Checkout Flow
Nuvemshop provides all the necessary REST and JavaScript APIs to allow third-party developers to take care of the whole implementation in a completely autonomous way, without intervention from our development team at all.
Available Checkout Payment Options
Currently, there are three main Checkout Payment Options. Below are quick descriptions of these to give some context and to align the reader with these concepts:
Transparent Payment Option
This approach keeps the buyer at the merchant's website during all the checkout process:
- The form for each supported payment method is rendered on the merchant's website.
- The order data together with the selected payment method information is sent to the Payment Provider.
- The credit or debit card sensible information never goes in a readable way to the Payment App's backend, but under a security strategy such as tokenization, encryption, etc., so that the Payment Provider will be the only able to read it's content.
This option gives the buyer a more store-branded experience which improves the user experience quality and it sense of security.
External Payment Option
Pretty much a standard redirect payment flow:
- The merchant's website sends the order data to the Payment Provider.
- The Payment Provider process the order, creates a payment preference and returns a redirect URL.
- The buyer is redirected to the Payment Provider's website.
- The buyer follows the checkout flow.
- If the buyer has an account on the Payment Provider and wallet features are supported, this flow has a very smooth UX.
- The buyer is redirected back to the merchant's website and lands on a success, failure or cancel page.
Modal Payment Option
Some Payment Providers offer SDKs which render a lightbox or modal with an embedded iframe containing the Payment Provider's checkout UI on the merchant's website, giving the buyer a more transparent-like experience. In this case, though the buyer never really leaves the merchant's website, the checkout flow is run under the Payment Provider's domain.
This option allows the app to take full control of the frontend and render all the necessary elements to start the payment process.
Note: This implementation requires a rigorous internal certification process.
Checkout Payment Options Implementation (Checkout JS API)
As explained before, the developer is in charge of the JavaScript and REST implementations. The developer's JS implementation must follow our JS API specifications in order to properly integrate with our checkout. The file containing the app's JS implementation must be hosted on a CDN which must be able to handle potentially high traffic concurrency with, of course, a secure URL.
The app's checkout payment options script location must be indicated in the checkout_js_url property of the Payment Provider object, which our checkout will fetch when needed.
In this link you can find very detailed information on how the Checkout JS API is implemented.
Adding a Checkout Payment Option
As explained previously on the Checkout Configuration section, Checkout Payment Options have two interfaces: the REST interface for Payment Provider's configuration and the JavaScript interface for frontend event handling.
Our frontend provides a context through the LoadCheckoutPaymentContext() global function. This function takes another function as parameter which, in turn, takes two arguments, a Checkout object and an object of the PaymentOption family.
Therefore, your JavaScript file should look like this:
// acme.js
LoadCheckoutPaymentContext(function(Checkout, PaymentOptions) {
  // Your code here.
});
To add a payment option, the method Checkout.addPaymentOption() must be called passing an instance of one of the available PaymentOptions objects. This instance must be created with all the necessary event handlers and an id property with the same value as the one configured in the associated checkout payment option at the Payment Provider object.
If, due to a business rule, the payment option should not be rendered, the Checkout.unLoadPaymentMethod() method must be called passing the payment option id.
A full description of the available PaymentOptions can be found here.
Transparent Card Implementation Example
Let's assume we've created a Payment App called "Acme Payments" and now we want to implement a Transparent Card Option so the user can pay with a credit or debit card inside the store checkout. So, we have to create an instance of PaymentOptions.Transparent.CardPayment and add it to the Checkout by using the Checkout.addPaymentOption() method:
// acme.js
LoadCheckoutPaymentContext(function(Checkout, PaymentOptions) {

  // We create an instance of the transparent card payment option.

  var AcmeTransparentCardPaymentOption = new PaymentOptions.Transparent.CardPayment({
    id: "acme_transparent_card", // Same `id` as in the REST API checkout payment option.

    version: 'v2', // We indicate that this payment option implements backend to backend payment processing.

    // We indicate which extra fields we want to render in the form.
    fields: {
      card_holder_id_number: true
    },

    // `onLoad` handler is common to all `PaymentOptions`.
    onLoad: function() {
      // Do something after the script loads.
    },

    // `onDataChange` handler is specific to `Transparent.CardPayment` option.
    onDataChange: Checkout.utils.throttle(function() {
      // It can be used to, for example, read the card data, perform validations, refresh the installments data, etc.
    }, 700),

    // `onSubmit` handler is common to all `PaymentOptions`.
    onSubmit: function() {
      // Do something when user submits the payment.
    },

    // More handlers...
  });

  // Finally, we add the Payment Option to the Checkout object so it can be render according to the configuration set on the Payment Provider.

  Checkout.addPaymentOption(AcmeTransparentCardPaymentOption);
});
PaymentOptions.Transparent.CardPayment takes care of rendering the card form and any information which may be relevant to the user, such as the available card brands and banks, and the installments data.
The fields property lets you select which optional input fields must be rendered on the card form. More information and a list of the available fields for this payment option can be found here.
The handler onDataChange will be invoked every time the checkout data is modified. This handler should implement business rules to validate the card's information and to update the installments data that is displayed to the buyer.
External Payment Implementation Example
Let's assume we've created a Payment App called "Acme Payments" and now we want to implement an External Payment Option so the user can paid from Acme's website. So, we have to create an instance of PaymentOptions.ExternalPayment and add it to the Checkout by using the Checkout.addPaymentOption() method:
// acme.js
LoadCheckoutPaymentContext(function(Checkout, PaymentOptions) {

  // We create an instance of the external payment option.

  var AcmeExternalPaymentOption = new PaymentOptions.ExternalPayment({
    id: 'acme_external', // Same `id` as in the REST API checkout payment option.

    // Define all necessary handlers here.
  });

  Checkout.addPaymentOption(AcmeExternalPaymentOption);
});
Available Information about the Ongoing Sale
The Checkout object provides the app with access to all the data related to the ongoing sale. We've got the following data groups:
- Cart Information:
Checkout.getData('order.cart'). - Total cart price:
Checkout.getData('totalPrice')(also indicated byCheckout.getData('order.cart.prices.total')). - ID of the store to which the cart belongs:
Checkout.getData('storeId'). - Consumer Contact Information:
Checkout.getData('order.contact'). - Billing Information:
Checkout.getData('order.billingAddress'). - Shipping Information:
Checkout.getData('order.shippingAddress'). - Shipping Method Information:
Checkout.getData('order.cart.shipping'). - Payment Method Information:
Checkout.getData('form').
Form Data
Some SDKs have mechanisms to render forms using field names as required. To protect the UI and provide the user with a clean and smooth user experience, all forms are rendered by our own code following our standards with custom field names, as explained above.
The object Checkout.getData('form') provides access to all the form fields. The payment method implementation must map each of the provided fields to the Payment Provider specific ones. In cases where a form with specific attributes needs to be submitted, we recommend using workarounds such as dynamically creating a hidden HTML form and submitting it using JavaScript.
Take into account that it is possible to request the consumer with more payment method information by rendering the optional fields on the form, depending on the selected payment method.
The available fields are:
Details on how to render the optional ones can be found here.
Adding Multiple Payment Options
Any number of payment options can be added to the checkout, combining external and transparent options as preferred. Nuvemshop's checkout may filter and hide some of them due to UX business rules being applied in order to improve the conversion rate.
For example, if "Acme Payments" wants to add three different payment options, one for their own external checkout, one for transparent card and another one for transparent boleto, the Payment Provider must specify the following checkout_payment_options:
{
  "name": "Acme Payments",
  "checkout_js_url": "https://cdn.acme.com/js/acme.js",
  "checkout_payment_options": [
    {
      "id": "acme_external",
      "name": "...",
      "description": "...",
      "logo_url": "...",
      "supported_billing_countries": [
        "BR"
      ],
      "supported_payment_method_types": [
        "credit_card",
        "debit_card",
        "boleto",
        "pix",
        "wire_transfer",
        "wallet"
      ]
    },
    {
      "id": "acme_transparent_card",
      "name": "...",
      "description": "...",
      "logo_url": "...",
      "supported_billing_countries": [
        "BR"
      ],
      "supported_payment_method_types": [
        "credit_card",
        "debit_card"
      ]
    },
    {
      "id": "acme_transparent_boleto",
      "name": "...",
      "description": "...",
      "logo_url": "...",
      "supported_billing_countries": [
        "BR"
      ],
      "supported_payment_method_types": [
        "boleto"
      ]
    }
  ]
}
Note: Most of the Payment Provider properties are being omitted for better readability.
Then, the JavaScript implementation must have an instance for each Checkout Payment Option defined in the Payment Provider configuration:
LoadCheckoutPaymentContext(function(Checkout, PaymentOptions) {

  let AcmeExternalPaymentOption = PaymentOptions.ExternalPayment({
    id: 'acme_external',
    version: 'v2',
    fields: {...},
    scripts: 'https://...',
    onLoad: function(){...},
    onSubmit: function(callback){...}
  });

  let AcmeTransparentCardPaymentOption = PaymentOptions.Transparent.CardPayment({
    id: 'acme_transparent_card',
    version: 'v2',
    fields: {...},
    scripts: 'https://...',
    onLoad: function(){...},
    onDataChange: function(){...},
    onSubmit: function(callback){...}
  });

  let AcmeBoletoPaymentOption = PaymentOptions.Transparent.BoletoPayment({
    id: 'acme_transparent_boleto',
    version: 'v2',
    fields: {...},
    scripts: 'https://...',
    onLoad: function(){...},
    onSubmit: function(callback){...}
  });

  Checkout.add(AcmeExternalPaymentOption);
  Checkout.add(AcmeTransparentCardPaymentOption);
  Checkout.add(AcmeBoletoPaymentOption);
});
The script can have any number of checkout payment option instances, however, only those specified on the Payment Provider will be loaded. This allows the developer to have one static JavaScript file with logic for all configurations and then manage the available Payment Options for each store by adding them or not to the Payment Provider object.
Step 5: Implement the Payment Processing Flow
Currently, the payment processing flow supports these three APIs:
- Process Payment API: Used to charge consumers.
- Cancel Payment API: Used to cancel a consumer charge. It is necessary to safely recover from unexpected errors during payment request processing.
- Payment Status API: Used to check the current status of the transactions of an order.
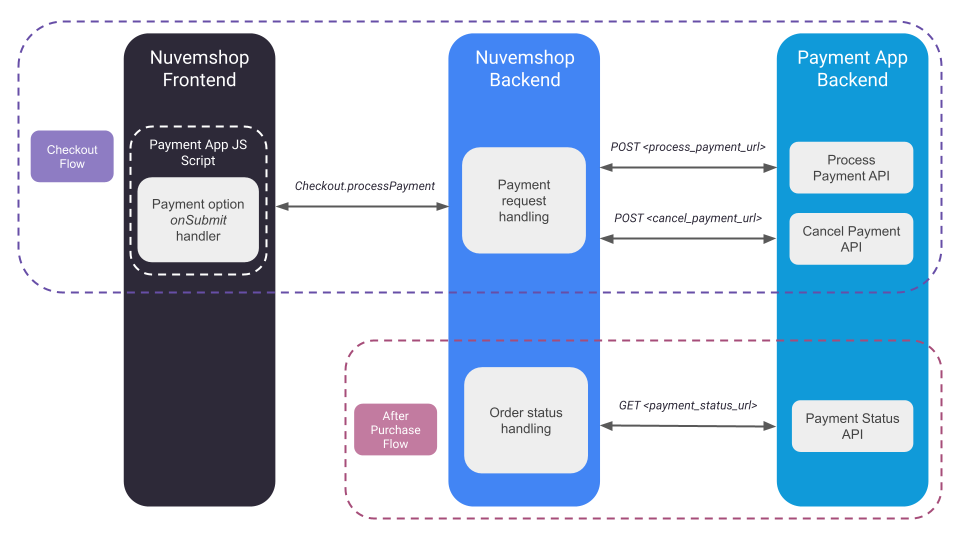
While the Process and Cancel Payment APIs are used together to process payments during checkout, the Payment Status API serves as an independent tool. This standalone API can be used to avoid known issues even if the app is still using the legacy JS integration.
These APIs need to be configured for your app so our platform knows how to perform these requests. More information about this one-time configuration can be found here.
Request Authentication
You can define the authentication method used in these APIs. To do this, you must update the authentication field of the store's Payment Provider object with the values of the credentials corresponding to the merchant's account.
We currently support OAuth, Basic, Token, and API Key authentication methods. For more information on what to include in the authentication object, check the Authentication section of the Payment Provider documentation.
API Key
- For this method we need to persist the
api_keyvalue. - This will add the following query param to the request:
?api_key=API_KEY_VALUE.
OAuth
- For this method we need to persist
the
access_token,client_id,client_secret,refresh_tokenandrefresh_token_urlvalues, along with theexpires_atdate of the token. - This will add the following header to the request:
Authorization: Bearer ACCESS_TOKEN_VALUE. - The merchant's access token will be periodically refreshed by our platform before its expiration date following the OAuth standard process and using the data provided here.
Basic Authentication
- For this method we need to persist the
usernameandpasswordvalues. - This will add the following header to the request:
Authorization: Basic ENCODED_STRING_VALUE, whereENCODED_STRING_VALUEis the Base64 encoding ofusernameandpasswordjoined by a:.
Token
- For this method we need to persist the
access_tokenvalue. - This will add the following header to the request:
Authorization: Bearer ACCESS_TOKEN_VALUE. - The difference with the OAuth method is that in this case the token is not refreshed by us, but it can be periodically updated by the app.
Request Validation
To ensure the requests are actually sent by us and have not been compromised in any way, the following measures are implemented:
Whitelisted IPs
Requests will only be sent from the following public IP addresses of our platform, which may change over time:
100.24.139.243.86.72.13854.88.85.16
Payload Signature
To further enhance security, each request will include the custom headers X-Timestamp and X-Signature.
X-Timestamp
Its purpose is to provide a timestamp for the request, indicating the exact time when the request was sent. This timestamp can be used to verify the timing of the request and to help prevent replay attacks.
Signing Process
We will set the payload signature in the X-Signature header of the request, generated by the following process:
- The payload is formatted as a JSON string, removing all line breaks.
- The SHA-256 digest of the payload is calculated.
- The
URL,timestampanddigestare concatenated using pipes:[URL]|[Timestamp]|[Digest]. - The concatenated string is signed using RSA encryption with SHA-256 algorithm and our private key.
Verification Process
The payload signature verification process on the app side must be as follows:
- Format the received payload as a JSON string, removing all line breaks.
- Calculate the SHA-256 digest of the payload.
- Concatenate the
URL,timestampanddigestusing pipes:[URL]|[Timestamp]|[Digest]. - Verify the concatenated string using RSA signature verification with SHA-256 algorithm, the received signature and the provided public key.
Note: Both the payload data and the result of the concatenated string must be encoded to UTF-8 for the verification process.
For more details, see the available examples of the verification process described above: Node.js, PHP, Bash.
By implementing these security measures, we can ensure that only authorized requests are accepted and that the integrity of the payload is maintained throughout the transmission process.
Process Payment API
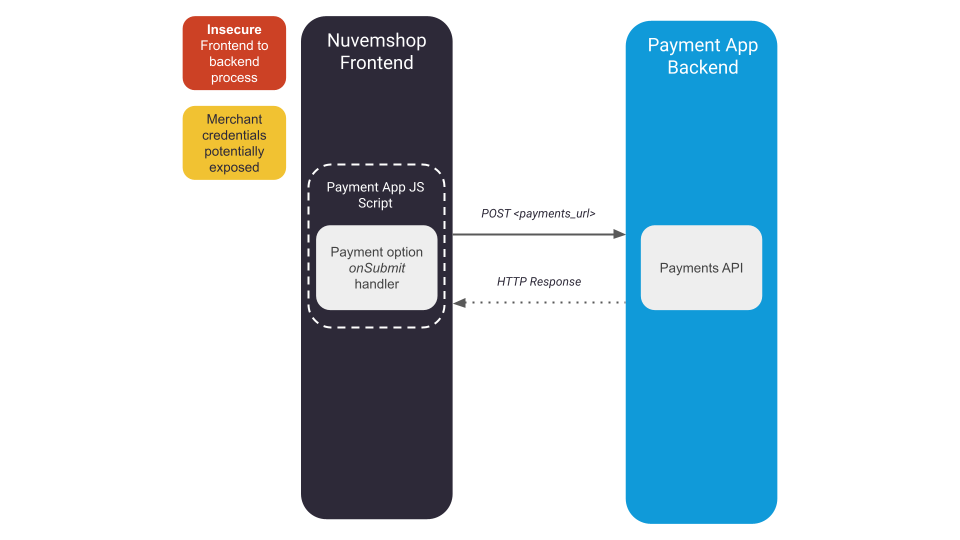
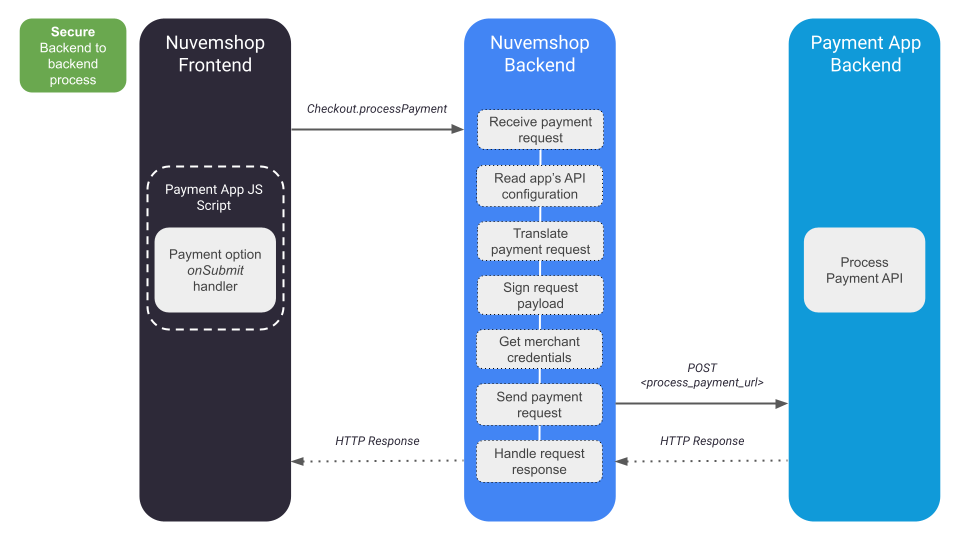
In order to avoid exposing sensitive payment information in your app's checkout JS script, such as merchant credentials, we provide a secure payment flow that allows you to process the payment requests in our backend, instead of executing them in the checkout frontend as has been done with the legacy JS integration.
In short, to implement the backend-to-backend secure payment processing flow you must follow these steps:
- Provide our Support team the Process Payment API configuration for your app.
- Implement the Process Payment API in your app's backend.
- Implement the
Checkout.processPaymentandCheckout.showErrorCodemethods in your app's JS script.
JS Script Methods
Checkout.processPayment(extraPayloadData)is a method from our PaymentLib that allows your app to process backend-to-backend payments by calling it from the app's JS script. As we saw before, our platform has a generic payload that can be adapted to a specific payload that conforms to your app's API. But also, if necessary, this standard payload can be extended by adding custom data inside anextraobject. The content of thatextraobject, which is optional, must be passed to theprocessPaymentmethod. Theextracontent can also be translated following the same mapping rules as for the default payload.Checkout.showErrorCode(errorCode)is a method from our PaymentLib that allows your app to display an error message for the consumer at the current payment option form. It takes any value defined in our error code library as a parameter, which will be translated into the corresponding error message according to the language used by the store.
Note: It is necessary to indicate the value
v2in theversionfield explicitly in order to enable a Payment Option to process payments through theCheckout.processPaymentmethod. Payment Options that do not indicate the version or have the valuev1will be unable to useCheckout.processPaymentand payment requests made using this method will fail.
Let's go with an example:
LoadCheckoutPaymentContext(function(Checkout, PaymentMethods) {
    var ExternalPaymentOption = PaymentMethods.ExternalPayment({
        id: 'acme_redirect',

        version: 'v2',

        onSubmit: function(callback) {
            let extraData = {
                "email": Checkout.getData('order.contact.email')
            }
            Checkout.processPayment(extraData)
                .then(function(payment) {
                    window.parent.location.href = payment.redirect_url;
                })
                .catch(function(error) {
                    Checkout.showErrorCode(error.response.data.message);
                });
        }
    });

    Checkout.addPaymentOption(ExternalPaymentOption);
});
Following the previous example, in the Payload configuration we must indicate how to map the
content of the extra object that we are adding to the default payload:
{
   "payload":{
      "customer":{
         "email":"#extra.email"
      }
}
Request
Our platform has a generic payment payload that contains data related to the order which is generated when the consumer submits the checkout process after selecting a payment option of your app. The payload format can be adapted through the Payload configuration.
The extra key is intended strictly for essential, non-standard information that cannot be obtained from the base payload, such as card tokens or captcha results. For all standard data requirements, we recommend using the base payload, which has been updated to provide more comprehensive information. Partners should only rely on extra when the base payload does not cover a specific need, and should prefer base payload fields whenever possible to help us move toward a fully standardized API. If the base payload is missing information you require, instead of adding it to extra, please reach out to our support team so we can evaluate the case and potentially include it in the base payload.
We recommend using the default payload data as shown in the following example:
POST <process_payment_url>
{
  "cartHash":"550dd9597106547ef8854f90a0de979c3331e4fd",
  "store_id":"123456",
  "cartId":1130553175,
  "country":"BR",
  "ip":"200.6.89.141",
  "prices":{
    "shipping": "20.46",
    "discount_gateway": 0,
    "discount_coupon": 0,
    "discount_promotion": 0,
    "discount_coupon_and_promotions": 0,
    "subtotal_with_promotions_applied": 149.99,
    "subtotal_with_promotions_and_coupon_applied": 149.99,
    "subtotal": 149.99,
    "total": 170.45,
    "total_usd": 33.07,
    "currency":"BRL"
  },
  "shipping_address":{
    "id_number": null,
    "zipcode": "18160000",
    "first_name": "John",
    "last_name": "Doe",
    "address": "Rua Dejanira Soares Rosa",
    "number": "123",
    "floor": "Apto 32",
    "locality": "Parque Pirapora",
    "city": "Salto de Pirapora",
    "state": "São Paulo",
    "country": "BR",
    "phone": "+5515997772717",
    "between_streets": null,
    "reference": null
  },
  "billing_address":{
    "id_number": "14910600850",
    "zipcode": "18160000",
    "first_name": "John",
    "last_name": "Doe",
    "address": "Rua Dejanira Soares Rosa",
    "number": "123",
    "floor": "Apto 32",
    "locality": "Parque Pirapora",
    "city": "Salto de Pirapora",
    "state": "São Paulo",
    "country": "BR",
    "phone": "+5515997772717",
    "customer_type": "",
    "business_name": "",
    "trade_name": "",
    "state_registration": "",
    "fiscal_regime": "",
    "invoice_use": "",
    "document_type": ""
  },
  "payment":{
    "attemptId": "c9bf9e57-1685-4c89-bafb-ff5af830be8a",
    "integrationType":"transparent",
    "installments":"1",
    "providerId":"2f11a8b2-8afc-4754-870b-8f1bb24ce6a3",
    "discount":0,
    "is_retry":false,
    "type":"credit_card",
    "category":"credit_card",
    "went_to_gateway":false,
    "option":"2f11a8b2-8afc-4754-870b-8f1bb24ce6a3",
    "details":{
      "id_number":"12755459476",
      "id_number_type":"CPF",
      "holder_name":"John Doe",
      "phone_number":"5583999197756",
      "brand":"visa",
      "first_six_digits":"857439",
      "last_four_digits":"4932",
      "installments":"1",
      "expiration_year":"32",
      "expiration_month":"07"
    }
  },
  "items":[
    {
      "id":2993796234,
      "name":"SIDEBLINDER PRETO (PENNY) (Preto)",
      "name_without_variants":"SIDEBLINDER PRETO (PENNY)",
      "quantity":2,
      "free_shipping":false,
      "product_id":314605178,
      "variant_id":1416650745,
      "variant_values":"Preto",
      "brand":null,
      "price":{
        "value":74.99,
        "currency":"BRL"
      },
      "sku":"314605178-1416650745"
    }
  ],
  "customer":{
    "id":null,
    "email":"john.doe@gmail.com",
    "contact_name":"John Doe",
    "contact_phone":"+5583999197756",
    "id_number":"12755459476"
  },
  "extra": {
    "checkout_captcha_info":{
      "bot_score":97,
      "captcha_result":{
        "success":true,
        "errorCodes":[]
      }
    }
    // Extra data set by the app.
  }
}
Note: The
payment->attemptIdfield will always be present in the payload, regardless of the translation implemented by the Payment App. This value is the unique identifier for the payment attempt and will be used by the Cancel Payment API in case any error occurs during the payment processing request.
Response
Success Response
In the case of a successful response by the app's API after making the payment request, the Checkout.processPayment method will return the same content as the app response (e.g. an object containing the data of the created payment).
We recommend responding with the HTTP status code 201 Created.
Important: A successful response here does not imply that the order is created. To achieve this, we expect a transaction event to be sent through our Transactions API.
Client Error Response
In the case of a 4xx error coming from the app's API, the Checkout.processPayment method will return an error response with the following format:
{
  "status": 422,
  "message": "some_error_code"
}
Being the value of message one of the following:
- Some code specified in our error codes library, if the error code or message returned by the app's API could be correctly translated. See Payment Request Error Mapping.
payment_processing_error: Our generic payment processing error code, in case of the error code or message returned by the app's API could not be translated.
Server Error Response
In the case of an unexpected internal error, such as a fatal exception or a timeout, the Checkout.processPayment
method will return a response with our generic internal error code:
{
  "status": 500,
  "message": "general_internal_error"
}
Timeout
If we don't receive a response within 20,000ms after sending the request, we will trigger a timeout, and the response will be considered an error.
Cancel Payment API
This API will be used to ensure that consumers won't be charged if an unexpected error occurs during the payment process. Implementing this API is crucial for safely reversing any payment attempt, thereby providing a secure and reliable experience for consumers.
It's triggered when one of the following responses is received from the Process API:
- HTTP 5xx response
- Timeout – no response received after 20 000 ms
- Malformed JSON response (see Payment Request Error Mapping)
Request
Your endpoint should accept a unique payment attempt identifier as a parameter. This identifier corresponds to the same one that was originally provided in the Process Payment request.
POST <cancel_payment_url>?payment_attempt_id=<ID>
Response
Success Response
If the payment attempt is successfully cancelled, or if it was never processed, your API should return an HTTP status code 200 OK. This response indicates that the cancellation was successful, and no further charges will be applied to the consumer.
Error Response
If there is an error while processing the cancellation request, your API must return an appropriate HTTP status code in the 4xx or 5xx range, along with a JSON response containing a message that explains the reason for the failure. This message is intended for internal logging and troubleshooting purposes.
Example of an Error Response:
{
  "message": "Some error message"
}
Timeout
If we don't receive a response within 20,000ms after sending the request, we will trigger a timeout, and the response will be considered an error.
Retry Mechanism
In the event of an error response (HTTP 4xx or 5xx), our platform will automatically retry the cancellation request with an exponential backoff strategy until a successful response (200 OK) is obtained. This ensures robust handling of temporary issues or intermittent failures.
Idempotency
The Cancel Payment API must be idempotent. This means that if the same payment_attempt_id parameter is sent multiple times, only the first request should perform the cancellation. All subsequent requests with the same ID should return the same success response without any additional action, ensuring no duplicate charges or actions occur.
Payment Status API
This API should return the current status for each transaction related to the given cart/order. Since it's possible to have more than one transaction linked to a single order we expect the result to include an array.
Request
By default, the request includes a single query parameter, the order ID, although it can be configured to suit your needs.
GET <payment_status_url>?order_id=<ID>
Response
We recommend responding with the HTTP status code 200 OK. The response must be an array of transactions with the following properties:
| Field | Type | Description |
|---|---|---|
payment_provider_id | String | [Required] ID of the Payment Provider that processed this Transaction. |
payment_method | Object | [Required] Object containing the payment method used in this Transaction. See Payment Method. |
last_event | Object | [Required] Last transaction event that generated this Transaction. See Transaction Events. |
info | Object | [Required] Object containing specific info related to this Transaction. See Transaction Info. |
Here is an example of what a response should look like:
{
  "transactions": [
    {
      "payment_provider_id": "eeac118e-5534-40ba-b539-443449bc67a3",
      "payment_provider_tax_id": "12.345.678/0001-99",
      "payment_method": {
        "type": "credit_card",
        "id": "visa"
      },
      "info": {
        "card": {
          "brand": "visa",
          "expiration_month": 12,
          "expiration_year": 2020,
          "first_digits": "445566",
          "last_digits": "1234",
          "masked_number": "XXXXXXXXXXXX1234",
          "name": "Ash Ketchum"
        },
        "installments": {
          "quantity": 3,
          "interest": "0.15"
        },
        "external_id": "1234",
        "external_url": "https://mypayments.com/account/transactions/1234",
        "refund_url": "https://mypayments.com/transactions/refund",
        "supports_partial_refund": true,
        "ip": "192.168.0.25",
        "authorization_code": "123456"
      },
      "last_event": {
        "amount": {
          "value": "132.95",
          "currency": "ARS"
        },
        "type": "sale",
        "status": "success",
        "authorization_code": "123456",
        "happened_at": "2020-01-25T12:30:15.000Z"
      },
    },
    ...
  ]
}
Timeout
If we don't receive a response within 20,000ms after sending the request, we will trigger a timeout, and the response will be considered an error.
APIs Configuration
The APIs configuration is a series of directives that will allow us to build the requests to your app's API in our backend in order to send it with the expected format and handle its response properly.
Properties
| Field | Type | Description |
|---|---|---|
process_payment_api | Object | Process Payment API configuration. See Request configuration. |
cancel_payment_api | Object | Cancel Payment API configuration. See Request configuration. |
payment_status_api | Object | Payment Status API configuration. See Request configuration. |
Request Configuration
| Field | Type | Description |
|---|---|---|
url | String | HTTPS URL of the app to send the request. |
headers | Object | [Optional] Object containing key-value pairs with the headers that must be added to the request. See Request Headers. |
params | Object | [Optional] Object containing key-value pairs with the query parameters that must be appended to the end of the request URL. |
payload | Object | [For Process Payment API only - Optional] Object containing key-value pairs with the necessary mappings to adapt our standard payment payload to the payload required by the app payment request. See Payment Request Payload Customization. |
errorCodePath | String | [For Process Payment API only - Optional] Path to find the value of the error code or message in the payment request response in case of failure. See Payment Request Error Mapping. |
errorCodes | Object | [For Process Payment API only - Optional] Object containing key-value pairs with the necessary mappings to adapt the error codes or messages returned by the payment request to standard values defined in our error code library. See Payment Request Error Mapping. |
Here is an example of what a JSON would look like for the APIs configuration of a Payment App:
{
  "process_payment_api": {
    "url": "https://acme.com/payments",
    "headers": {
      "Connection": "keep-alive",
      "PaymentOptionId": "#extra.option_id"
    },
    "params": {
      "platform_id": "1234",
      "store_id": "#store_id"
    },
    "payload": {
      "order_id": "#cartId",
      "items": "#extra.items",
      "payment": {
        "amount": "#prices.total",
        "currency": "#currency",
        "installment": "#payment.installments",
        "card_brand": "#extra.payment.card_brand"
      },
      "billing_address": "#billing_address",
      "customer": "#extra.customer",
      "card_token": "#extra.payment.card_token",
      "country": "BR"
    },
    "errorCodePath": "#errors.0.message",
    "errorCodes": {
      "The card does not have sufficient funds": "card_rejected_insufficient_funds",
      "identification_value_is_empty": "consumer_id_invalid"
    }
  },
  "cancel_payment_api": {
    "url": "https://acme.com/payments/cancel",
    "headers": {
      "Connection": "keep-alive"
    }
  },
  "payment_status_api": {
    "url": "https://acme.com/payments/status",
    "params": {
      "sort": "date_created",
      "criteria": "desc"
    }
  }
}
Request Headers
It is not necessary to add the headers Content-Type: application/json and Accept: application/json since we include them in all our payment requests by default.
We also include the X-Signature and X-Timestamp custom headers related to the security of the request, explained in this section.
Payment Request Payload Customization
The payload configuration is an object containing key-value pairs with all the necessary mappings to adapt our standard payment payload to the payload required by the app payment request.
The keys represent the names of the fields of the app's payment request body. Fields can be nested as many levels as needed. The idea is that the JSON object represented here has the same format as the JSON object that is required by the app's payments API.
The values that accompany each key can be fixed or variable. A variable value, unlike a fixed value, begins with the symbol #. What follows this symbol is a path, which specifies the location of the source field in the standard payload where we must get the value to be placed in the destination field of the app's payload.
The # symbol in addition to the path content is what we call a marker. Defining a path inside a marker is pretty straightforward. The symbol . denotes a nesting level, that is, it will be used to access an object within the JSON. While to access the element of an array, you must indicate the number corresponding to the index to be accessed.
The following are some examples of markers that can be used to define config values:
- For a field in the JSON root:
#prices - For a nested field:
#prices.subtotal - For an array element:
#payment.extra.2.id(Here, we are accessing theidof the third element of thepayment->extraarray)
Based on the previous examples, if we want to include the value of the prices->total field of the standard payload in the payment->amount field of the Payment App payload, we must add the following configuration:
{
  "payload": {
    "payment": {
      "amount": "#prices.total"
    }
  }
}
To implement a fixed value in the app payment payload, you can simply add the following configuration. Note that values not containing the # symbol will not be translated and will be set with the content defined in the configuration:
{
  "payload": {
    "country": "BR"
  }
}
Note: The markers notation explained above to define configuration values for the Payload also applies to the Headers, Parameters and Error Code Path configurations as well.
Payment Request Error Mapping
Here is an example of how to configure the error mapping for your app's API errors to values from our standard error codes library. If your app's API error
response already applies our standard error response format (E.g. {"error_code":"card_rejected"}), you don't need to implement any mapping here.
{
  "errorCodePath": "#errors.0.message",
  "errorCodes": {
    "The card does not have sufficient funds": "card_rejected_insufficient_funds",
    "identification_value_is_empty": "consumer_id_invalid"
  }
}
errorCodePath: Path to find the value of the error code or message in the payment request response in case of failure.errorCodes: Object containing key-value pairs with the necessary mappings to adapt the error codes or messages returned by the payment request to standard values defined in our error code library.
Step 6: Implement the Transaction API
Payment Apps work with orders. However, we don't provide any endpoint to directly change an order's payment status. That's where Transactions come in.
A Nuvemshop order can have many Transactions. A Transaction represents a single intention of moving money. If, for any reason (e.g. "insufficient funds") a Transaction failed, the next buyer's attempt to pay for the order would be a new Transaction. Likewise, an order paid with two credit cards would have one Transaction per credit card since two movements of money are being performed.
An order will automatically calculate its current payment status by checking all of its related Transactions and applying some business rules.
The full Transaction resource specification can be found here.
Creating a Transaction
The Payment App's backend must POST a Transaction to our platform as soon as one is created on the Payment Provider's side.
A Transaction not only helps to calculate an order payment status but also provides detailed information about the payment process so that the merchant can have full autonomy when handling orders and dealing with payment issues. Also, this information is always important to help the merchant with feature business decisions.
As a reference, here are two examples of the implementation of the POST Transaction request.
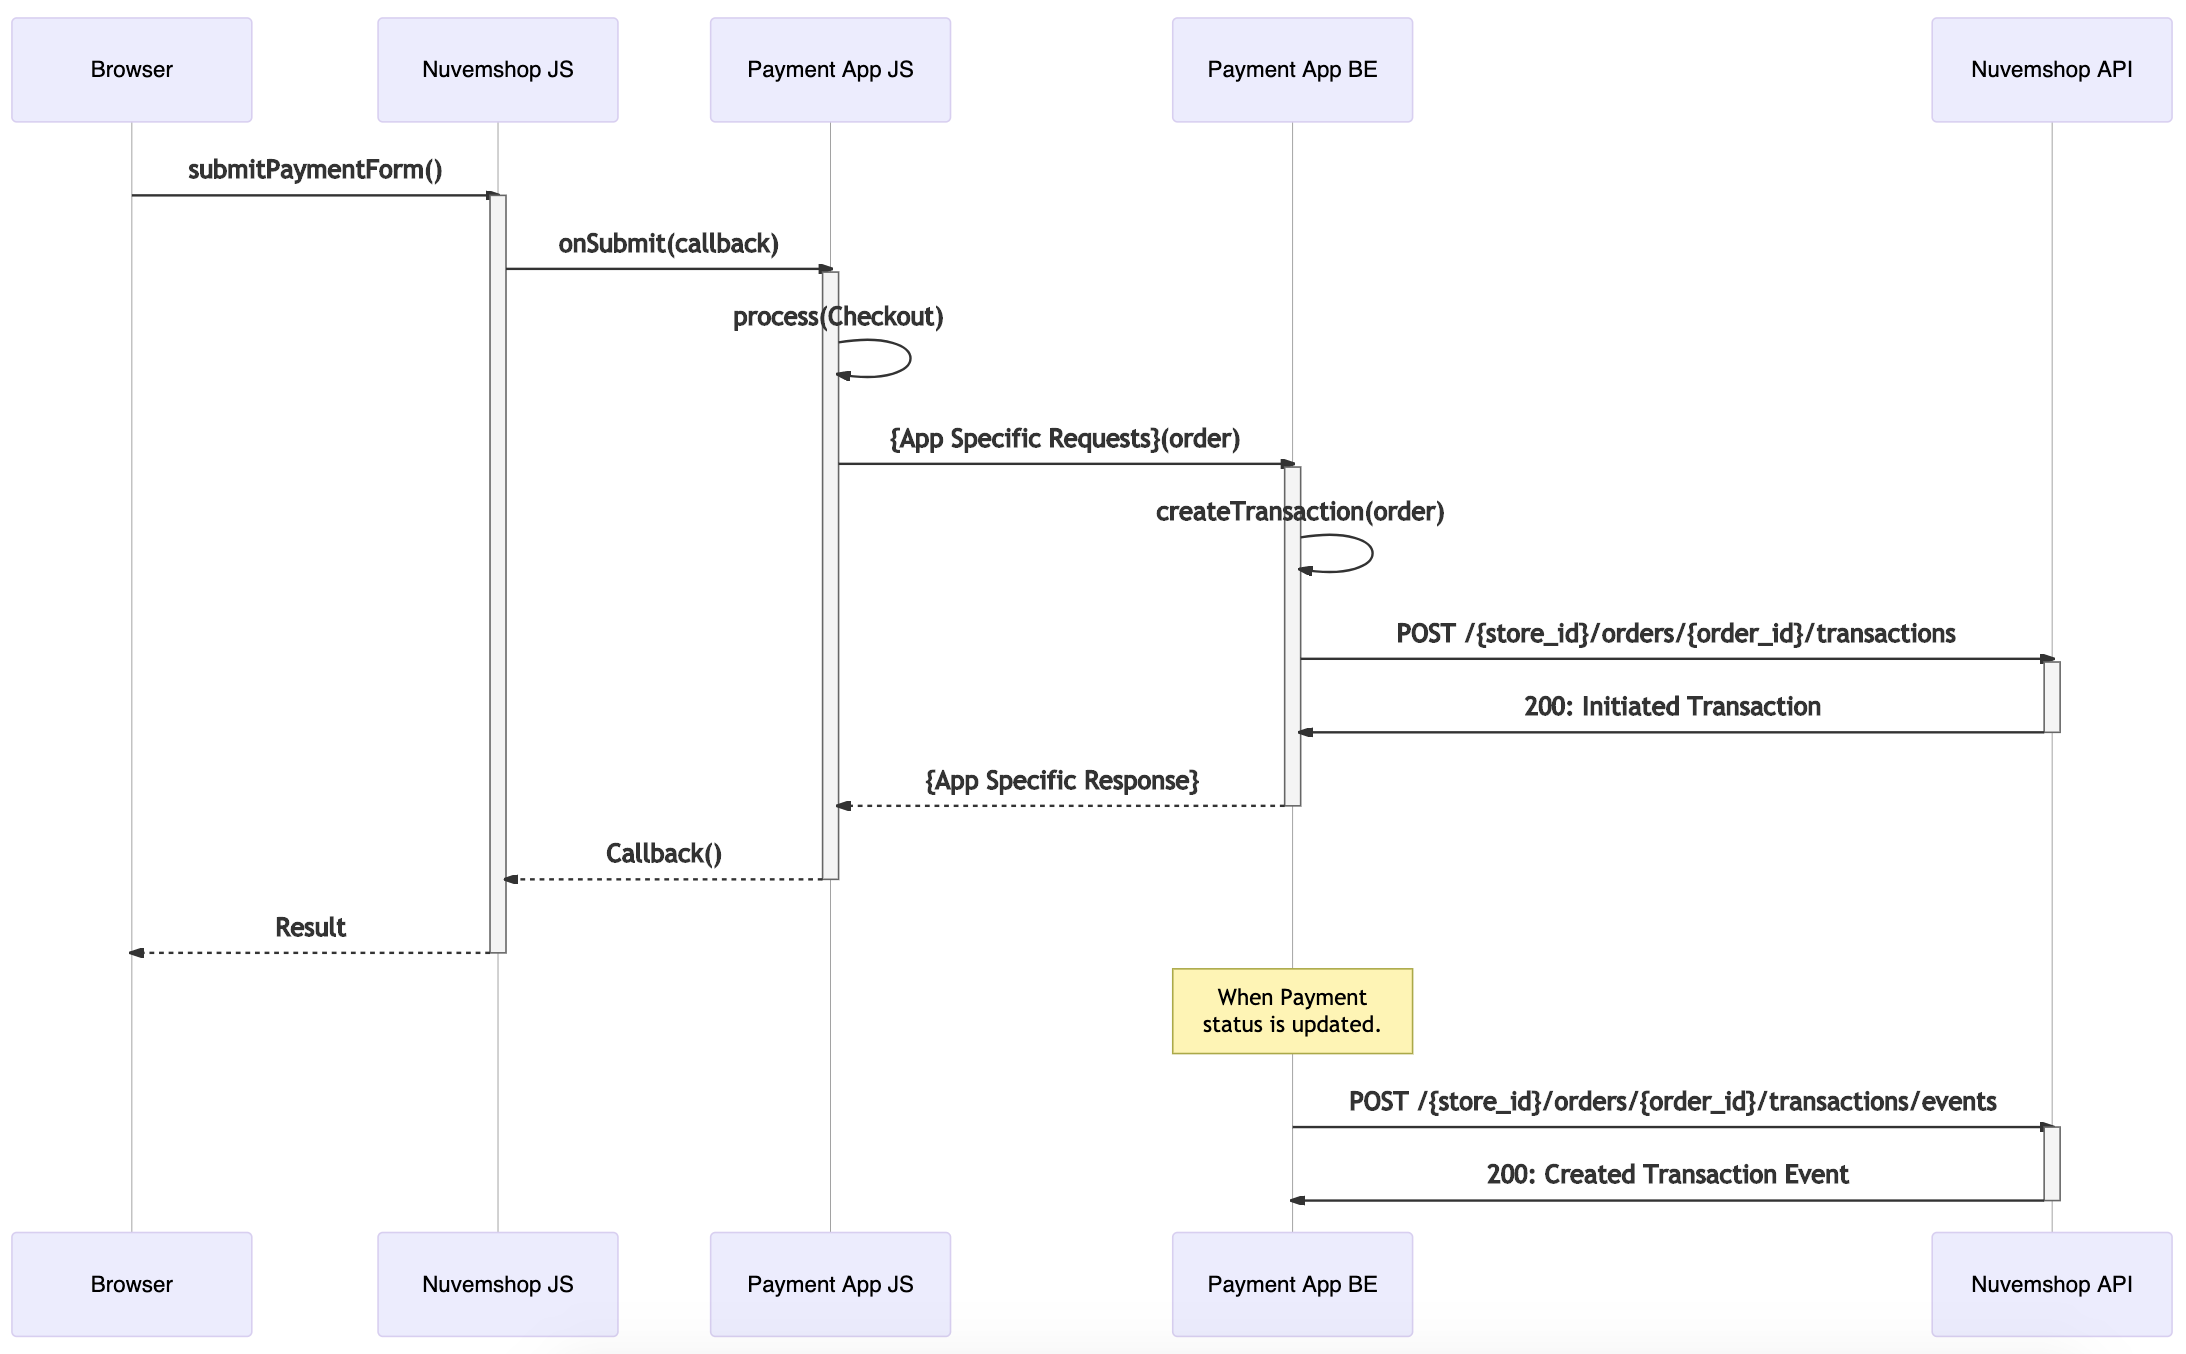
Example with transparent payment option:
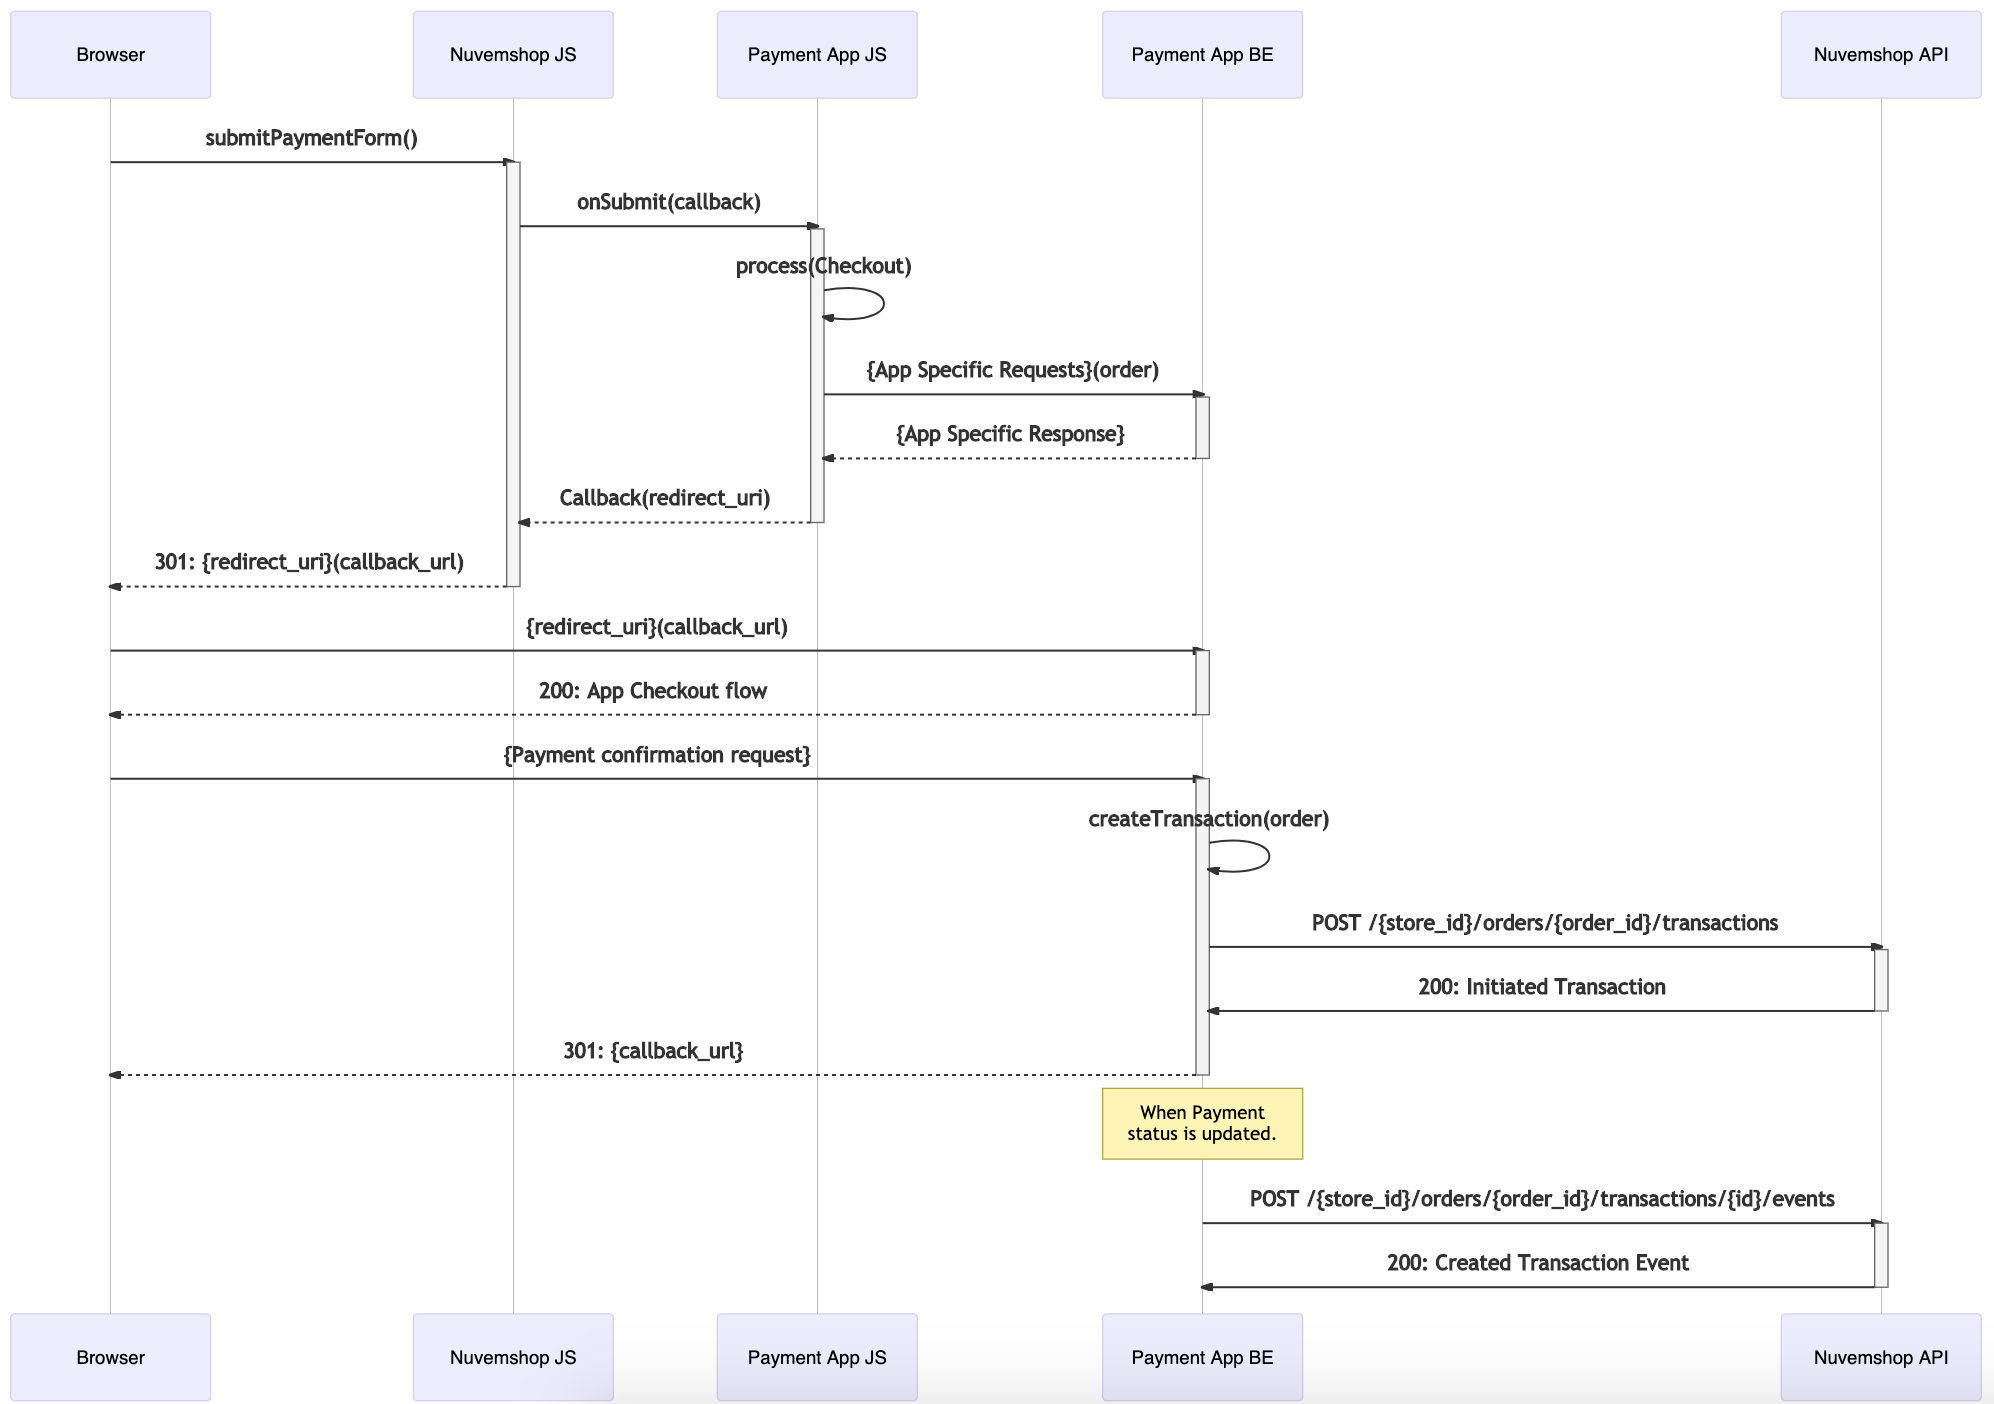
Example with external payment option:
Transaction Properties
To ensure the best visibility on payments to both buyers and merchants,, it's very important to provide as much information as possible about each Transaction.
The TransactionInfo object should be completed with all the information required for each payment method.
Updating a Transaction
Nuvemshop's Transaction API is designed to reflect transactions that already exist and events related to those transactions that have already happened. Our Transaction API will automatically calculate the Transactions status on every TransactionEvent reported by the Payment Provider using the TransactionEvent endpoint.
Transaction Event Workflow
The possible TransactionEvents that a Transaction can receive, depend on the possible workflows for each Payment Method Type.
The payment methods boleto, ticket, bank_debit, debit_card, wallet, wire_transfer, cash and pix, all share the same events workflow.
On the other hand, credit_card has its own workflow to support all the transaction events specific to this payment method type.
Order Management after Purchase
Currently, consumers can't cancel orders from their purchase tracking page. In case they want to cancel a purchase, they will need to contact the seller.
Refunds
Merchants will be able to refund orders in two ways: from the store's dashboard or from the payment provider's dashboard.
If your Payment App supports Transaction refunds, then you must specify a refund URL within the Transaction data every time you create one. In this way, when merchants want to cancel an order from the store's dashboard, they will have the possibility of returning the money to the consumer. If this is so, Nuvemshop will notify your app of the refund intention through the refund URL specified for the Transaction related to the order. For more details on the implementation of the refund URL, visit the following link.
Likewise, if your app supports it, merchants could also perform Transaction refunds from the Payment Provider dashboard.
Either way, once a Transaction is refunded, then a TransactionEvent of type refund must be posted for the corresponding Nuvemshop's Transaction.
Chargebacks
A chargeback is the reversal of a credit or debit card payment initiated when a cardholder disputes a transaction directly with their bank or the card issuer, rather than the merchant. While this process aims to safeguard consumers against fraud or unauthorized transactions, it can sometimes be subject to misuse. For more details, refer to the API definition available here.
Infrastructure
It is important to take into account that Nuvemshop is a platform with 150k+ stores. This means the Payment App's backend will need to be able to handle high-traffic loads. All the necessary scaling, performance monitoring and alert triggering architecture must be implemented.
Special dates like Black Friday, Cyber Monday and Hot Sale should be handled with care. Your app should be able to sustain heavy loads with multiple very high traffic peaks.
FAQ
Why is my Payment App not being shown in the payment methods section of the store's admin panel
For a Payment App to be displayed in the store's admin panel, a series of requirements must be met:
- The app must be approved and published by Nuvemshop.
- The app should have the Payments category, and the write_payments permission. These options can be modified in the app details page on the partner's admin panel.
- The app needs to have it's metadata file inserted by Nuvemshop (see Metadata section above).
Note: Currently, only Nuvemshop can insert the app's Metadata. The process is as follows: the partner must create the Metadata JSON file, and then send it to the Platform Development team.
Why is my Payment App's option not being shown in the store's checkout?
For a Payment App option to be displayed in the checkout, a series of requirements must be met:
- All the requirements of the previous question.
- The app must be installed in the store.
- The app must have inserted a Payment Provider object.
- At least one of the ids of the Payment Options in the checkout.js file must match one of the ids of the checkout_payment_options in the Payment Provider object.